Anatomiekenntnisse sind für Künstler unerlässlich, da sie die Grundlage für die präzise Darstellung des menschlichen Körpers bilden. Sie helfen Künstlern, Proportionen, Bewegung und das Zusammenspiel von Muskeln und Knochen zu erfassen, was zu realistischeren und ausdrucksstärkeren Kunstwerken führt.
Wie soll ich anfangen?
Beginnen Sie Ihr Anatomiestudium, indem Sie sich mit dem Skelettbau und den Muskelgruppen vertraut machen. Nutzen Sie anatomische Diagramme, Bücher und Online-Ressourcen, um Knochen und Muskeln zu identifizieren. Verstehen Sie nach und nach, wie diese Elemente in verschiedenen Posen und Bewegungen zusammenwirken. Üben Sie das Skizzieren nach der Natur oder anhand von Referenzbildern, um Ihr Verständnis zu festigen. Dies ist unerlässlich, um ein besserer Künstler zu werden. In diesem Artikel untersuchen wir wichtige Knochenteile des Kopfes und deren Bedeutung für das Zeichnen eines Porträts.
Verschwenden Sie Ihre Zeit mit der Suche nach brauchbaren Porträtvorlagen? In einem Ordner auf meinem Pinterest-Profil finden Sie tolle Bilder.

Machen Sie sich mit dem Aufbau des Schädels vertraut und achten Sie dabei besonders auf Merkmale wie Kiefer, Wangenknochen und Augenhöhlen. Lernen Sie die Gesichtsmuskeln kennen, um subtile Nuancen im Gesichtsausdruck einzufangen. Dieses Wissen verbessert Ihre Fähigkeit, lebensechte und ausdrucksstarke Porträts zu erstellen.
Ein interessanter Aspekt beim Zeichnen von Porträts in Bezug auf den Schädel ist das Konzept der „Loomis-Methode“. Dieser vom Künstler Andrew Loomis entwickelte Ansatz legt Wert auf die Verwendung vereinfachter geometrischer Formen zur Konstruktion von Kopf und Gesichtszügen. Das Verständnis der zugrundeliegenden Schädelstruktur hilft Künstlern bei der Anwendung dieser Methode und schafft so die Grundlage für präzisere und proportionalere Porträtzeichnungen. Lesen Sie hier mehr über diese Methode.
Anatomie lernen bedeutet, Dinge zu identifizieren! Zeichnet man Knochen, Muskeln oder Fett, so hilft einem das, wenn man diese Dinge unterscheiden kann, sehr dabei, Schatten zu erkennen.
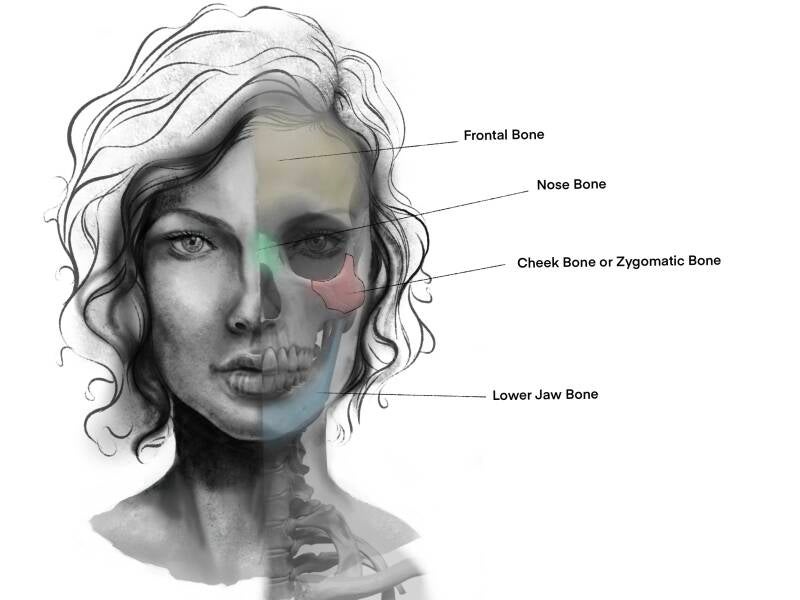
4 wichtige Knochenbereiche des Gesichts

Frontal Bone
Das Stirnbein formt die Stirn und beeinflusst die gesamte Gesichtsstruktur. Die Kenntnis seiner Konturen hilft, Kopfformen und -proportionen präzise darzustellen. Das Stirnbein hat eine leicht konvexe Form, die zu der harmonischen Kontur der Stirn beiträgt. Für Künstler ist es von Vorteil, die markante Stellung des Stirnbeins im oberen Schädelbereich und seinen Übergang zur Augenbrauenregion zu kennen.
Nose Bone
Das Nasenbein bildet den Nasenrücken und beeinflusst mit seiner Struktur maßgeblich das Gesamtbild. Achten Sie auf die Länge und den Winkel des Nasenbeins sowie auf seine Verbindung zu den anderen Gesichtszügen. Der Nasenbereich geht sanft in die Augenpartie über und weist naturgemäß harte Schatten auf.
Neben dem Nasenbein ist das Verständnis der darunterliegenden Knorpelstruktur entscheidend für das Zeichnen der Nase. Der Knorpel formt die Nasenspitze und die Nasenflügel und beeinflusst so die Gesamtform und das Aussehen. Die Beobachtung des Lichteinfalls auf die knöchernen und knorpeligen Elemente hilft dabei, die feinen Konturen, Schatten und Lichter einzufangen, die die Nase in Zeichnungen realistisch wirken lassen.
Cheek Bone
Das Jochbein spielt eine wichtige Rolle bei der Gesichtsformung. Es beeinflusst die Gesichtskonturen und trägt zum Gesichtsausdruck bei. Die Kenntnis seiner Lage und Ausprägung hilft uns Künstlern, realistische Gesichter darzustellen und das Spiel von Licht und Schatten einzufangen.
Es befindet sich unterhalb der Augen und an den Seiten des Gesichts, formt die Wangen und trägt zur Gesichtsstruktur bei.
Für Porträtkünstler ist es wichtig zu wissen, dass unter diesem Knochen ein natürlicher Schatten entsteht.
Der Knochen selbst ist leicht rau, und das Licht fällt von oben darauf.
Lower Jaw Bone
Der Unterkieferknochen, auch Mandibula genannt, spielt eine entscheidende Rolle beim Ausdruck von Emotionen. Er ist für die Bewegungen des unteren Gesichtsbereichs verantwortlich und beeinflusst Mimik wie Lächeln, Stirnrunzeln und Kauen. Das Verständnis der Konturen und des Bewegungsumfangs des Unterkiefers ermöglicht es Künstlern, ein breites Spektrum an Emotionen darzustellen und ihren Porträts mehr Lebendigkeit zu verleihen.
Beim Schattieren des Unterkieferknochens in einer Gesichtszeichnung sollten Sie die Lichtrichtung und die Anatomie dieser Region berücksichtigen. Dunklen Sie Bereiche ab, in denen der Kieferknochen zurücktritt, beispielsweise unterhalb der Kinnlinie, und hellen Sie Bereiche auf, in denen er stärker hervortritt, wie an den Seiten. Achten Sie auf das Zusammenspiel von Licht und Schatten, um die dreidimensionale Form des Kiefers zu vermitteln und so den Realismus Ihres Porträts zu erhöhen.

Das Verständnis des Zusammenspiels von Gesichtsmuskulatur und Knochen ist für Künstler unerlässlich, um realistische Gesichtsausdrücke in Porträts einzufangen. Die Muskeln spielen eine wichtige Rolle bei der Formung der Gesichtskonturen. Achten Sie besonders auf die Verbindungen zwischen Muskeln und Knochen, insbesondere im Bereich von Augen, Mund und Kiefer.
In diesem Artikel möchte ich Ihnen erklären, warum es für Künstler wichtig ist, Anatomie zu lernen. Sie müssen nicht alle Fachbegriffe für jeden Muskel oder Knochen kennen. Wichtig ist vielmehr das Wissen um deren Lage, um Ihre Darstellung zu verbessern.
Ich selbst habe mit der Porträtmalerei begonnen, ohne dieses Wissen zu besitzen, und verstehe daher nicht, warum es so wichtig ist, dies beim Malen zu berücksichtigen. Lassen Sie uns daher eine klare Grenze ziehen zwischen dem Malen eines Gesichts und einem tiefen Verständnis der Anatomie.
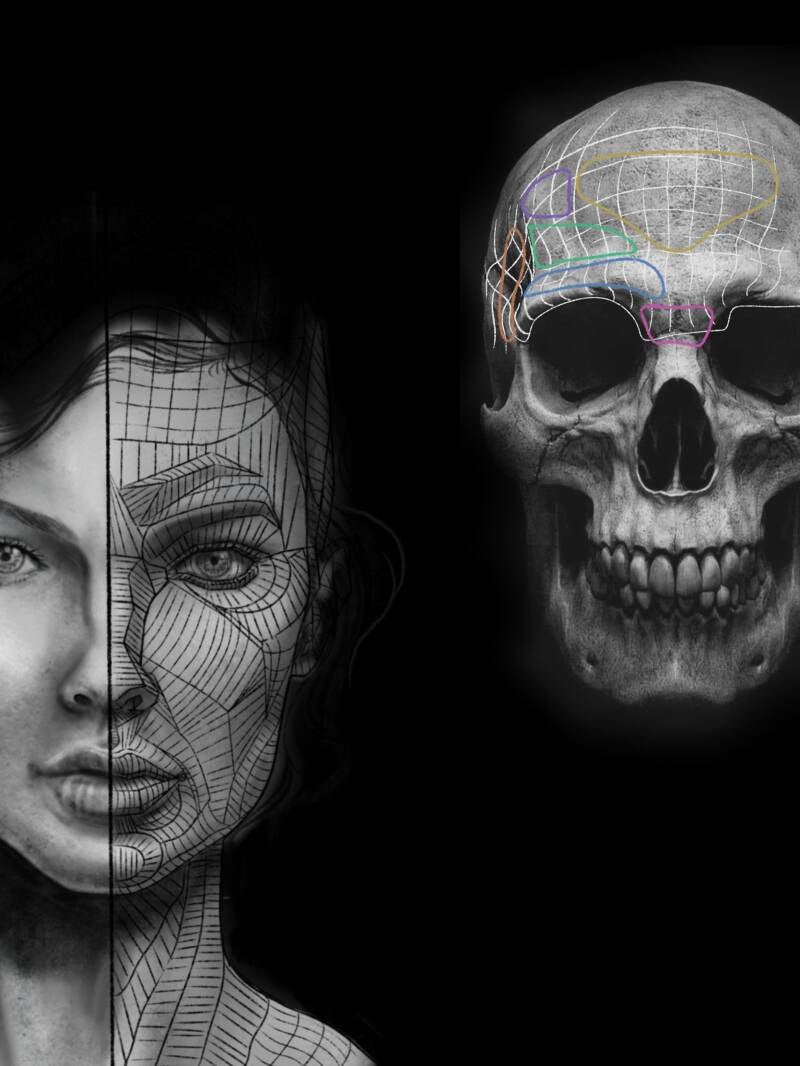
Frontal Bone

Bei der Darstellung der Stirnpartie in einem Porträt ist das Spiel von Licht und Schatten entscheidend.
Heben Sie den oberen Teil der Stirn hervor, wo sich das Stirnbein befindet, um dessen Wölbung zu betonen. Achten Sie auf den Einfallswinkel und die Lichtintensität, da diese die Bereiche mit Licht und Schatten beeinflussen. Diese nuancierte Herangehensweise verstärkt die Dreidimensionalität des Stirnbeins in Ihrem Kunstwerk
.
Blauer Bereich:
Hier befinden sich die Augenbrauen. Über den Augenbrauen liegt ein kleiner Bereich, der mehr Licht erhält.
Grüner Bereich:
Nach der Augenbraue und ihrer konvexen Wölbung beginnt eine leichte Vertiefung. Hier befindet sich ein Schatten.
Violett: Achten Sie auf die Lichtverhältnisse in Ihrem Porträt. Mein Beispiel zeigt, dass dieser Bereich weniger Licht erhält. Das Licht kommt von oben. In der Mitte des Stirnbeins befindet sich mehr Licht, im violetten Bereich weniger.
Oranger Bereich:
Dieser Bereich erhält oft mehr Schatten. Hier herrscht weniger Licht.
Gelber Bereich: Aufgrund seiner Form fällt in der Mitte der Stirn mehr Licht. Je nach Lichtverhältnissen nimmt das Licht zu den Seiten und nach unten hin ab.
Rosa Bereich:
Hier befindet sich der Übergang vom Stirnbein zum Nasenbein. Zeichnen Sie hier einen weichen, dunkleren Übergang. Der Bereich in Richtung Augen wird aufgrund seiner von Natur aus länglicheren Form noch dunkler gezeichnet.
Nose Bone
Hier einige Tipps für die gelungene Darstellung der Nase in einem Porträt:
1. Beleuchten Sie den oberen Nasenrücken, um die knöcherne Struktur hervorzuheben.
2. Fügen Sie einen Schatten unterhalb des Nasenbeins hinzu, um die Vertiefung zwischen den Augen darzustellen.
3. Beleuchten Sie den unteren Teil der Nase, wo sich der Knorpel befindet, um ihn vom knöchernen oberen Teil abzugrenzen.
4. Fügen Sie Schatten um die Nasenlöcher hinzu, um Tiefe und die Form der Nase zu vermitteln.

Roter Bereich:
Hier findet der Übergang vom Stirnbein zum Nasenbein statt. Dieser Bereich wird aufgrund der konvexen Krümmung oft dunkler dargestellt.
Violett:
Dieser Bereich wird zum Auge hin immer dunkler.
Gelber Bereich: Je nach Nasenform sollte dieser Bereich etwas dunkler als die Nasenmitte bemalt werden.
Gelber Bereich:
Die Nasenmitte und -spitze erhalten mehr Licht.
Grüner Bereich:
Unterhalb der Nasenspitze fällt naturgemäß weniger Licht, daher wird dieser Bereich dunkler bemalt.

Cheek Bone & Jawbone

Beim Zeichnen von Wangen- und Kieferpartie in einem Porträt ist das Verständnis der Anatomie und der gekonnte Umgang mit Licht und Schatten entscheidend:
1. Betonen Sie den oberen Rand des Wangenknochens, um seine Kontur hervorzuheben. Schatten darunter verstärken die Struktur.
2. Definieren Sie die Kieferlinie durch ein Zusammenspiel von Licht und Schatten. Heben Sie die Stellen hervor, an denen das Licht auf den Kiefer fällt, und fügen Sie Schatten darunter hinzu, um Tiefe zu erzeugen.
3. Die Gesichtsmuskeln sind mit diesen Knochen verbunden und beeinflussen die Konturen beim Ausdruck von Gesichtsausdrücken. Stellen Sie subtile Veränderungen der Muskeln dar, um den Realismus zu erhöhen.
4. Achten Sie auf die Lichtrichtung in Ihrer Vorlage oder Szene. Heben Sie die Stellen hervor, an denen das Licht auf Wangen- und Kieferknochen fällt, und fügen Sie Schatten hinzu, um Tiefe zu erzeugen.
5. Beziehen Sie Ihr Wissen über die Gesichtsmuskeln in die Darstellung von Gesichtsausdrücken ein. Dies verleiht Ihren Porträts Authentizität.
Denken Sie daran: Übung macht den Meister. Experimentieren Sie und verfeinern Sie Ihre Fähigkeiten, um Ihre Porträtzeichnungen zu verbessern.
Das Jochbein, auch Jochbein genannt, hat eine leicht abgeflachte und gebogene Form. Es erstreckt sich über den oberen Teil der Wange und trägt zur Gesichtskontur bei.
Im Profil wirkt es oft markanter, während es von vorn die seitliche Gesichtspartie prägt. Das Verständnis seiner Form und seines Zusammenspiels mit Licht und Schatten ist entscheidend für die präzise Darstellung von Gesichtszügen in der Kunst.
Der Unterkieferknochen, auch Mandibula genannt, ist ein U-förmiger Knochen, der den unteren Teil des Schädels bildet. Er beherbergt die unteren Zähne und ist für verschiedene Funktionen wie Kauen und Sprechen unerlässlich.
Die Muskeln, die den Unterkieferknochen bedecken, prägen seine Gesamtform und definieren seine Konturen und Bewegungen. Das Verständnis dieser Muskelanatomie ist für Künstler unerlässlich, um Mimik und Dynamik in ihren Werken präzise darzustellen.


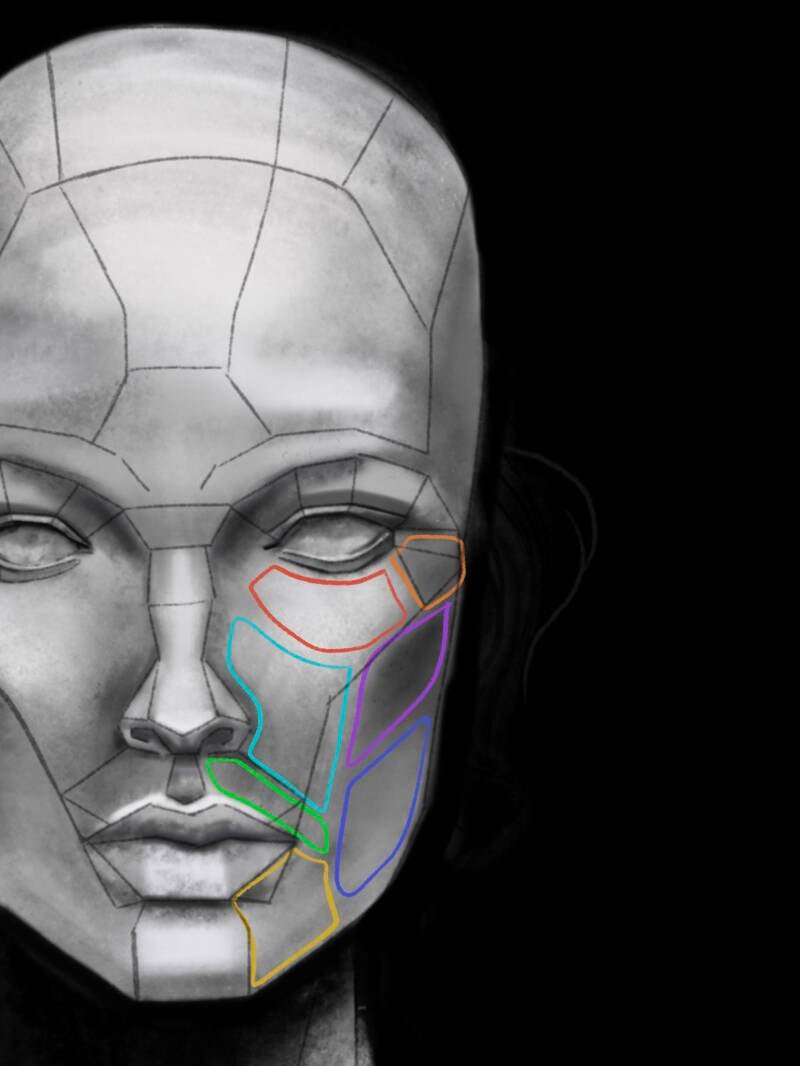
Oranger Bereich:
Der Wangenknochen beginnt neben dem Auge. Aufgrund seiner besonderen Form absorbiert dieser Bereich besonders viel Licht.
Roter Bereich:
Hier endet der Wangenknochen. Hier herrscht Licht.
Violettbereich:
Hier entsteht der Schatten, der vom Wangenknochen ausgeht.
Hellblauer Bereich:
Vom Wangenknochen in Richtung Nase und Mund wird dieser Bereich je nach Lichteinfall dunkler.
Dunkelblauer Bereich:
Unter dem Schatten der Wangenknochen wird dieser Bereich wieder etwas heller. Je nach Lichteinfall kann er nach außen hin noch heller werden, insbesondere bei seitlichem Licht.
Grüner Bereich:
Der Mundbereich ist leicht erhaben und abgerundet. Hier fällt mehr Licht hin, während es in Richtung Nase wieder etwas dunkler wird.
Gelber Bereich:
Der Bereich neben dem Mund weist unterschiedliche Licht- und Schattenbereiche auf. Betrachten Sie Ihre Vorlage genau, um die genauen Bereiche zu bestimmen.
TIPP:
Die Graustufenmalerei ist eine wertvolle Übung, um das Gesicht präzise darzustellen. Sie ermöglicht es Künstlern, sich ganz auf das Verständnis und die Erfassung des Spiels von Licht und Schatten zu konzentrieren, ohne von Farben abgelenkt zu werden. Dieser monochrome Ansatz trägt dazu bei, ein solides Fundament in Bezug auf Tonwerte, Kontraste und Form zu entwickeln. Die Beherrschung der Graustufenmalerei verbessert die Fähigkeit eines Künstlers, Tiefe, Struktur und Gesichtszüge nuancierter und überzeugender wiederzugeben.
Hier ist eine Buchempfehlung für Künstler, die tiefer in die Anatomie eintauchen möchten.


Kommentar hinzufügen
Kommentare